The modern coffee renaissance has empowered enthusiasts to transcend basic drip brewers and embrace the intricate art of espresso-based beverages. Crafting cafe-quality drinks at home is no longer a luxury reserved for professional baristas; it is an accessible skill rooted in understanding extraction, milk chemistry, and precise layering techniques. Whether you are craving the striking temperature contrast of a dirty coffee or the comforting, chocolate-infused richness of a mocha, mastering these five foundational recipes will elevate your daily caffeine ritual into a true culinary experience.
The Art of the Perfect Dirty Coffee
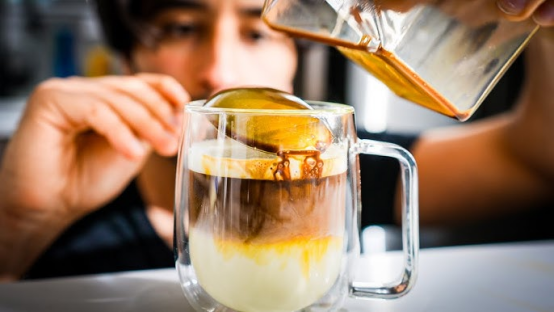
The dirty coffee is a visual and sensory masterpiece that relies entirely on temperature and density contrasts. Originating in specialty Asian coffee shops, this beverage is defined by a thick, hot layer of intense espresso slowly cascading into a glass of ice-cold milk. The result is a dynamic drinking experience where the first sip delivers a punch of hot, acidic coffee, followed immediately by the soothing, sweet chill of cold milk. Unlike an iced latte, a dirty coffee is never stirred before drinking.
Essential Ingredients and Preparation
To achieve the signature “dirty” aesthetic—where the espresso bleeds downward in beautiful, muddy tendrils—you must manipulate the physical properties of your ingredients. The milk must be as cold as possible without freezing, and the espresso must be brewed fresh and hot.
- Ultra-Chilled Milk: Place your serving glass and milk in the freezer for 10 minutes prior to brewing. The heightened density of the cold milk acts as a buoyant foundation for the hot espresso.
- Ristretto Extraction: For the most profound flavor and thickest crema, pull a double ristretto rather than a standard espresso. A ristretto uses the same amount of coffee grounds but half the water, resulting in a more viscous, syrupy shot that floats perfectly.
- The Spoon Technique: To prevent the hot espresso from immediately piercing the cold milk layer, hold a chilled spoon just above the surface of the milk. Pour the espresso slowly over the back of the spoon to disperse its kinetic energy.

Crafting a Decadent Caramel Macchiato
The term “macchiato” translates to “stained” or “marked” in Italian. While a traditional espresso macchiato is simply a shot of espresso marked with a dollop of foam, the modern caramel macchiato reverses this concept entirely. In this beloved cafe staple, a large volume of vanilla-sweetened steamed milk is heavily aerated to create a dense layer of foam, which is then “stained” by pouring espresso through the center. The drink is finally crowned with a rich caramel drizzle.
Layering Mechanics and Flavor Balancing
Building a caramel macchiato is an exercise in architectural layering. If constructed correctly, the beverage should present distinct strata: vanilla syrup at the base, warm milk in the middle, a robust espresso band just below the foam, and a sweet caramel finish.
- Foundation of Vanilla: Begin by adding 1 to 2 tablespoons of high-quality vanilla syrup to the bottom of your mug. This provides the aromatic base note that complements the bitterness of the coffee.
- Steaming for Stiff Foam: Aerate your milk longer than you would for a latte. You need a stiff, pillowy microfoam that can support the weight of the caramel drizzle without collapsing. Pour the steamed milk over the vanilla syrup, leaving about an inch of space at the top of the mug.
- The Center Pour: Brew a fresh shot of espresso in a small pitcher. Slowly and deliberately pour the espresso directly into the center of the milk foam. The espresso will pierce the foam and settle between the liquid milk and the frothy top layer.
- The Crosshatch Finish: Apply caramel sauce in a tight crosshatch pattern over the foam, followed by a double circle around the rim. This ensures that every sip contains a hint of buttery caramel.

Brewing a Rich and Comforting Mocha
The mocha, or caffè mocha, is the ultimate marriage of two of the world’s most complex flavor profiles: roasted coffee and cacao. A true cafe-quality mocha does not simply taste like hot chocolate with a splash of coffee; it requires a delicate equilibrium where the earthy, fruity notes of the espresso are amplified by the deep, bittersweet characteristics of premium chocolate.
Choosing the Right Chocolate Base
The foundation of a spectacular mocha lies in the chocolate you select. While commercial syrups are convenient, they often contain excessive sugar that masks the coffee’s nuanced flavors. For a professional-grade beverage, creating a bespoke chocolate ganache or slurry is highly recommended.
- The Cocoa Powder Slurry: Combine two tablespoons of high-quality, unsweetened Dutch-processed cocoa powder with a tablespoon of hot water and a teaspoon of raw sugar. Stir vigorously until it forms a thick, glossy paste. This prevents undissolved powder from floating to the top of your drink.
- Real Chocolate Melting: Alternatively, place roughly chopped dark chocolate (at least 60% cacao) at the bottom of your mug. Extract the hot espresso directly over the chocolate, letting the heat of the coffee melt the cocoa butter. Stir until completely homogenized.
- Milk Integration: Steam your milk to a silky, velvety texture, similar to a latte. Pour the steamed milk into the chocolate-espresso mixture from a height to ensure thorough mixing, then bring the pitcher close to the surface to lay down a thin layer of foam.

Perfecting the Classic Cafe Latte
The caffè latte is the cornerstone of the modern coffee menu. Comprising one part espresso to three parts steamed milk, topped with a delicate layer of microfoam, the latte is a testament to the transformative power of milk chemistry. When milk is steamed correctly, its lactose breaks down into sweeter, more perceptible sugars, whilst the proteins unravel to trap air, creating a texture akin to melted ice cream.
The Science of Microfoam and Pouring
Achieving the perfect latte at home demands mastery over the steam wand. The goal is not to create large, soapy bubbles, but rather microscopic air bubbles that are uniformly distributed throughout the milk, resulting in a glossy, wet-paint appearance.
- Aeration (Stretching): Submerge the steam wand tip just below the surface of cold milk. Turn on the steam and slowly lower the pitcher until you hear a gentle, rhythmic tearing sound (often compared to paper tearing). Introduce air for exactly 3 to 5 seconds.
- Emulsification (Rolling): Once the milk has expanded by about 20%, submerge the wand slightly deeper and tilt the pitcher to create a rapid whirlpool. This spinning action breaks down large bubbles and folds the microfoam into the liquid milk. Stop steaming when the pitcher is almost too hot to touch (around 140°F to 150°F).
- The Pour: Swirl the espresso to break up the crema. Pour the milk from about three inches above the cup to mix it with the espresso. Once the cup is two-thirds full, lower the pitcher until it is resting on the rim of the cup, and pour faster to allow the white foam to slide out and rest on the surface, creating the canvas for latte art.
The Essential Americano: Simplicity and Strength
The Americano is a study in elegant simplicity, consisting solely of espresso and hot water. Legend dictates that the drink was invented during World War II when American soldiers stationed in Italy diluted the local, intensely bitter espresso with hot water to mimic the drip coffee they were accustomed to back home. Today, the Americano is celebrated for its ability to open up the complex tasting notes of an espresso blend without the interference of milk or sugar.
Water Temperature and Pouring Sequence
While the ingredients are simple, the methodology behind combining them dramatically alters the final cup profile. The ratio typically ranges from 1:2 to 1:4 (espresso to water), depending on personal preference for strength.
- The Traditional Americano: Extract the espresso into your mug first, then pour hot water over it. This method breaks apart the crema, resulting in a cleaner, more uniform flavor profile from the first sip to the last.
- The Long Black Method: Pour the hot water into the mug first, then extract the espresso directly over the top of the water. This technique meticulously preserves the espresso’s crema, delivering a robust, aromatic, and intense first sip.
- Temperature Control: Never use boiling water, as it will scald the delicate espresso compounds and introduce a burnt, ashy bitterness. Aim for water heated to between 185°F and 195°F for the optimal dilution.
Comparing Your Favorite Coffee Drinks
To help you choose the perfect beverage for your morning routine, it is crucial to understand how the ratios of espresso, milk, and water interact. The following matrix breaks down the core components of each home-brewed masterpiece.
| Drink Type | Espresso Ratio | Milk / Water Ratio | Key Technique | Flavor Profile |
|---|---|---|---|---|
| Dirty Coffee | 1 Part (Ristretto) | 3 Parts (Ultra-Cold Milk) | Layering hot over cold via spoon | Intense hot coffee giving way to sweet, cold milk |
| Caramel Macchiato | 1 Part (Standard) | 4 Parts (Steamed Milk & Heavy Foam) | Espresso poured through stiff foam | Vanilla-sweetened, caramel-forward, milky |
| Mocha | 1 Part (Standard) | 3 Parts (Steamed Milk) + Chocolate | Melting chocolate directly with espresso | Rich, bittersweet, chocolate-infused |
| Latte | 1 Part (Standard) | 3-4 Parts (Steamed Milk & Microfoam) | Creating glossy, wet-paint microfoam | Smooth, naturally sweet, creamy |
| Americano | 1 Part (Standard) | 3-4 Parts (Hot Water) | Preserving or breaking the crema | Bold, clean, unadulterated coffee notes |
Frequently Asked Questions (FAQ)
- Can I make these espresso drinks without an expensive espresso machine?
- Yes, while a pump-driven espresso machine yields the most authentic results, you can create highly concentrated coffee using an Aeropress or a Moka pot. While these methods do not produce true 9-bar espresso crema, they provide a robust, dark coffee base that works beautifully for milk-based drinks like lattes and mochas.
- Why does my milk foam separate from the liquid so quickly?
- Rapid separation of foam and milk is usually caused by over-aerating (introducing too much air) or failing to properly “roll” the milk during steaming. To fix this, shorten the time you spend introducing air (the tearing sound) and ensure you create a strong whirlpool to integrate the microscopic bubbles thoroughly into the liquid.
- What is the best type of coffee bean for a caramel macchiato or mocha?
- For sweet, milk-heavy drinks with added syrups or chocolate, a medium-dark to dark roast is highly recommended. Beans with innate tasting notes of chocolate, nuts, or caramel (often sourced from Brazil or Colombia) will cut through the milk and sugar, ensuring the coffee flavor remains prominent and balanced.
- Is there a specific milk that works best for a Dirty Coffee?
- Whole milk is universally considered the best option for a dirty coffee. The higher fat content increases the milk’s density, making it easier for the hot espresso to float on top. If you prefer plant-based alternatives, “barista edition” oat milk provides the closest density and fat content to whole dairy milk.